Showing posts with label homemade. Show all posts

Monday, September 29, 2014

Apple Cinnamon Granola

I am always going through food phases, especially breakfast phases. Sometimes I'll be eating oatmeal every morning, every day, indefinitely. Sometimes I'm really into soft-boiled eggs. Right now I'm into granola, and thankfully it is the easiest thing to make at home. I love to eat mine with almond milk and some berries on top but it's great with yogurt too (obviously, if you didn't know that, get with it)! For this granola recipe I wanted to make use of our delicious Ontario MacIntosh apples, and I also added in some cinnamon to spice things up. Feel free to  change up the flavours with different fruits, nuts, and spices.


Ingredients

2 1/2 cups rolled oats
1/4 cup chia seeds
1/4 cup ground flax
1 teaspoon cinnamon
2 small apples, chopped
1/2 cup chopped walnuts
1/2 cup olive oil
6 tablespoons maple syrup

Preheat the oven to 325 F and line a baking sheet with parchment paper. In a large bowl combine all the ingredients until everything is well mixed, and the oats and seeds are moistened. The mixture should clump together slightly, but if it is still looking dry add in a little more oil and/or maple syrup until moistened. Evenly spread the mixture out on your baking sheet and bake for one hour, stirring half way to avoid burning. Allow to cool completely before storing.

Note: Feel free to change up the olive oil for coconut oil or the maple syrup for honey! If you're going to add any dried fruits add them after baking so they're still soft.

Monday, July 7, 2014

Belgian Waffles (with Maple Syrup)

One of my favourite childhood memories is waking up on a summer morning at the cottage, to the smell of homemade waffles. Nobody makes better waffles than my mother, that is a fact. They're perfectly crispy on the outside, light and fluffy on the inside, and best topped with real maple syrup and fresh berries. I was recently given a bottle of Lake of Bays Maple Syrup, and love pairing it with oatmeal, pancakes, but especially waffles. It is light in flavour, and perfectly sweet, the aroma alone will have you wanting to drown your breakfasts in real maple flavour. 


Ingredients

1 3/4 cups all purpose flour
3 teaspoon baking powder
1/2 teaspoon salt
1/4 cup vegetable oil
2 egg yolks
1 1/2 cups milk
2 egg whites

In a medium bowl combine the flour, baking powder and salt. Make a well in the center of the dry ingredients and add the vegetable oil and egg yolks. Gently stir, slowly adding in the milk. In a separate bowl, beat the egg whites until they form stiff peaks. Gently fold the whites into the waffle mixture - making sure not to over mix. Pour a scoopful into the heated waffle and cook according to your iron's instructions. 

Monday, February 10, 2014

Earl Grey Cake with Honey Buttercream


Remember that time I said I was going to lessen the food and just up the overall happy? Well food makes me happy and lately I've been baking up a storm so here's another recipe! Believe it or not I've actually been baking more than both the blog and Instagram might suggest - which really means I've been going baking crazy because there has been no shortage of food posts on either. 

The Pastry Affair is probably the best food blog out there. All the recipes I've tried are easy and delicious. She always has cute quotes to accompany the gorgeous food pictures and the ingredients are usually already in my cupboard - A++! That being said whenever I need some baking inspiration the Pastry Affair is where I go. Within a couple clicks I'm guaranteed to feel the creative juices flowing. Last week I really wanted to make cake but wanted it to be a bit "jazzier" than regular ol' chocolate or vanilla. Enter tea cake. A simple cake recipe with a deliciously light tea flavour, and honey buttercream frosting on top combine to give you one of the best ideas ever - tea you can eat!
Here's the recipe (adapted from the Pastry Affair): 


Ingredients

1 cup 2% milk
2 tablespoons Earl Grey Tea
(I used David's Tea 'The Earl's Garden')
1/4 cup unsalted butter, room temperature
1 cup granulated sugar
2 eggs
1/4 cup vegetable oil
1/2 teaspoon vanilla extract
1 3/4 cup all purpose flour
1 1/2 teaspoons baking powder
1/2 teaspoon baking soda
1/2 teaspoon salt

Preheat the oven to 350 F and lightly grease two 9-inch round cake pans.

In a small saucepan, warm the milk until simmering and stir in the Earl Grey tea. Remove from heat and allow to cool. In a mixing bowl, cream together the butter and sugar. Beat in the eggs, until well incorporated. Add in the vegetable oil and vanilla until fully combined. In a separate bowl, mix together the flour, baking powder, baking soda and salt. Gradually mix into the butter mixture until combined. Finally, stir in the tea and milk until the batter is is smooth (you can choose to leave the tea leaves in or out - I put in about half). Evenly spread the batter into the two cake pans and bake for 20-24 minutes, or until a tooth pick comes out clean. Allow to cool before icing or serving. 

For the honey buttercream, I completely followed the recipe on the Pastry Affair, with the addition of about 2 tablespoons of milk. 

I love the look of a naked cake, with the icing only in the middle and on top. There's something so rustic and cozy about the simplicity of it. If you're feeling fancy pipe a few designs on the top to make it extra pretty - I attempted some buttercream roses but they're more like swirlies. I just loved this cake, finally I can drink my tea, and eat it too! 

Friday, November 8, 2013

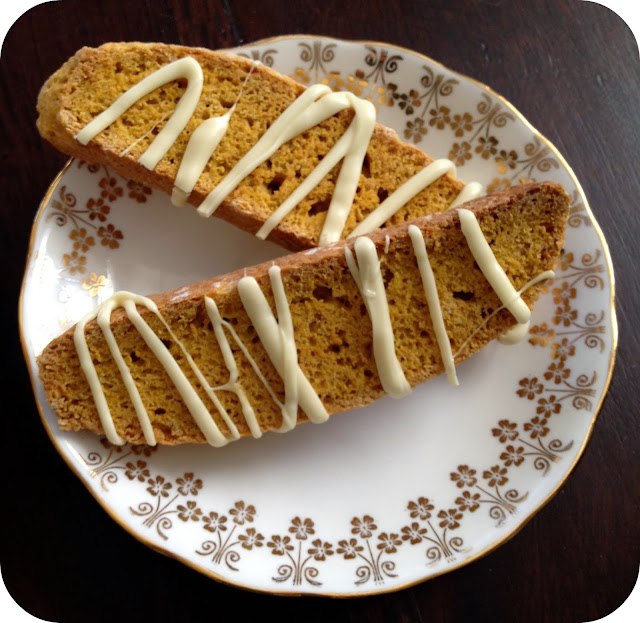
Pumpkin Spice Biscotti


Okay, okay, I know I just wrote about pumpkin taking over the world, and butternut squash still holds a place in my heart, I promise! Last night though, I just really need some of that deliciously spicy pumpkin tastes and I needed it in the form of biscotti. It was one of those nights where I needed to clear my head and make something. I needed a project. I've made biscotti a couple times before, with some success, and was inspired by Cupcakes and Cashmere to give this pumpkin spice version a try. Though the drying times were a bit tricky to figure out, this italian cookie is coffee's perfect match - especially in this rainy weather. What made the cookies even better was a light drizzle of white chocolate. Here's the recipe:

Ingredients

2 1/2 cups all-purpose flour
1 cup sugar
1 teaspoon baking powder
1 teaspoon ground cinnamon
1/2 teaspoon ground nutmeg
1/4 teaspoon ground ginger
1/4 teaspoon ground cloves
2 eggs
1/2 cup pumpkin puree
1 teaspoon vanilla extract
white chocolate chips

Preheat the oven to 350 F and line a baking sheet with parchment paper. In a medium sized bowl, whisk together the flour, sugar, baking powder, cinnamon, nutmeg, ginger and cloves. In a separate bowl, beat together the eggs pumpkin and vanilla. Mix together the flour and pumpkin mixtures. Use your hands to knead the dough in the bowl, combing all ingredients together, until it forms a ball of dough. On a floured surface shape the dough into two small logs approximately 1/2 inch thick and place on the baking sheet. Bake for approximately 20-22 minutes, until firm to touch. Remove from the oven, lower the temperature to 300 F, and allow the logs to cool for 10-15 minutes. Slice the logs, diagonally, into 1 inch pieces and lay face down onto the parchment. Bake for 15 minutes, flip the biscotti and bake for another 15 minutes. Allow the biscotti to cool for 15 minutes.

In the meantime, melt your white chocolate chips (I used about half a bag) in the microwave, in 30
second intervals. Pour into a ziplock bag, snip the corner, and drizzle over the biscotti. Allow to dry.

Grab your latte, cappuccino, espresso or whatever other hot beverage you're sipping and get dunking. One of the best parts of biscotti is they are a great excuse to have cookies for breakfast! If anyone questions it, say no words and pass them a biscotti, they'll understand.

Sunday, October 13, 2013

Foolproof Pumpkin Pie


Well it's the end of Thanksgiving weekend here in the Great White North, which really only means one thing - pie! Though my weekend was spent with papers and books spread across the kitchen table in preparation for midterms this week, I am thankful that I was able to do said studying up at the cottage surrounding by trees, fresh air and my family.


I've never made pie from scratch before and this year I decided to give it a go rather than ordering from our usual bakery. Having glanced through this book so many times at my friend's house and at work, I decided to get myself a copy and put to test her foolproof pumpkin pie recipe. Ina was not kidding, it really was a simple recipe to follow and was a great addition to the end of our turkey dinner (though I ate fish). The book also includes a basic pie crust and rum whipped cream recipe, but I decided to use the crust recipe on the back of my Crisco tin instead. Here's the recipe for Ina Garten's foolproof pumpkin pie filling:


Ingredients


1 15oz can of pumpkin puree (appx. 2 cups)
1/2 cup light brown sugar
1/4 cup white sugar
1/2 teaspoon ground cinnamon
1/4 teaspoon ground ginger
1/4 teaspoon ground nutmeg
1/2 teaspoon salt
3 large eggs, lightly beaten
1 cup heavy cream
1/2 cup whole milk
2 tablespoons dark rum

Preheat oven to 425 degrees. Place your unbaked crust in the bottom of an 11-inch pie pan, and cover with parchment paper and dried beans (we actually used a bunch of muffin liners and river rocks, it worked okay?). Bake for 15 minutes. Remove the paper and beans, prick the bottom with a fork and bake for an additional 3-5 minutes, watch for browning.

Reduce the oven to 350 degrees. Combine the pumpkin puree, brown and white sugar, cinnamon, ginger, nutmeg, salt, eggs, cream milk and rum with a whisk. Pour the mixture into your pie dish and bake for 50-60 minutes, until a knife comes out clean. Allow it to cool completely and serve with fresh whipped cream.


We've been enjoying the taste of pumpkin all weekend! We had some leftover crust and filling so we also made some mini pumpkin tarts in a muffin tin as well - delish! I'd have this breakfast, lunch, dinner and every snack in between if I could, it's really that good. Enjoy with loved ones, a warm fire and a good movie - three things that will definitely ensure you have a happy thanksgiving.

Tuesday, October 8, 2013

Apple Butter Me Up!


My main intention for apple picking a couple weekends ago was to make apple butter. Having made so much jam this summer I figured it'd be a piece of cake and I can always use another spread! Apple butter is way easier than jam. Especially crock-pot apple butter - you basically do no work. I searched through at least a dozen recipes until I found one I thought was perfect - some have too many ingredients, some use the stove top, all too much work - I picked this one. It's simple, painless and the slow cooker does pretty much everything for you (I was also swayed by the beautiful jars they have)!

Ingredients

20 small McIntosh apples - peeled, cored + chopped 
1 cup white sugar
1 cup light brown sugar
1 tablespoon ground cinnamon
1/2 teaspoon ground nutmeg
1/2 teaspoon ground cloves
1/4 teaspoon salt
1 teaspoon vanilla extract

Place your chopped apples into the slow cooker. In a bowl combine the sugars, cinnamon, nutmeg, cloves and salt, and pour over the apples, mixing until well coated. Set the slow cooker on low and cook for approximately 10 hours, stirring occasionally. Uncover and stir in the vanilla, cooking for another two hours uncovered, until thick. Using an immersion blender (or many stages of a regular blender), puree the mixture until completely smooth. Similar to with the jam, have the jars filled with hot water, and when ready to fill, pour out the water, fill the jar with apple butter, screw on the lid and wait for that popping seal of approval. Keep in the fridge for a couple weeks, or in the freezer for several months.

I've been spreading my apple butter on toast, stirring it into my oatmeal, and eating it with a spoon! It's the perfect combination of spicy and sweet and leaves my taste buds completely satisfied. 


Monday, September 23, 2013

Apple Oat Scones


Happy first day of fall! Even though technically it was yesterday I am celebrating today with hot cups of tea, snuggly blankets, cozy sweaters and everything pumpkin, apple and spice. School has been hectic and come October there will be even more to get done, but fall is my favourite season so I'm going to do everything I can to welcome it with open arms. These scones are perfect for just that. Our CSA shares have been filled with apples recently (and I know I didn't post Week 9, but it just came and went so quickly!) and the combination of oats and apples in Martha's scones were just perfect! Here's my version of the recipe:

Ingredients

1 2/3 cups of all purpose flour
1 1/3 cups rolled oats
1/2 teaspoon cinnamon
1/2 teaspoon nutmeg
2 teaspoon baking powder
3/4 teaspoon baking soda
1/2 teaspoon salt
1 1/2 sticks cold unsalted butter, cubed
1 1/2 cups diced apple 
2/3 cold buttermilk

Preheat the oven to 400 F and line a baking sheet with parchment paper. Mix together the flour, oats, cinnamon, nutmeg, baking powder, baking soda and salt. Using a pastry blender (or two knives works well too) cut in the butter until the mixture is crumbly. Stir in the apples and buttermilk just until mixed. On a lightly floured surface shape the dough into a large rectangle, about 1 1/2 inches thick. Cut the dough into 12 square scones and place onto the baking sheet. Bake for 18-20 minutes, until lightly browned.

As with most baked goods, these scone are best served warm on the day of. They're moist, not too dense and have the perfect amount of apple and spice. 

Tuesday, September 17, 2013

Rainbow Dipped Donuts


I've been seeing donut recipes pop up on Pinterest more and more lately and it just makes me feel more inspired to use my donut pan. It's only been used once before (on these chocolate beauties) and I figured it was about time it was dusted off. One of my favourite food bloggers, Joy the Baker, shared a fantastic recipe for a simple cake donut and it was exactly what I was looking for - Homer-simpson inspired, rainbow sprinkle donuts. These donuts are much lighter than my previous endeavour but they were still fantastic - the nuttiness from the browned butter is what makes these perfection. Here's the recipe!

Ingredients


1 cup white all-purpose flour
3/4 teaspoon baking powder
1/4 teaspoon baking soda
3/4 teaspoon cinnamon
1/3 cup granulated sugar
3 tablespoons salted butter
1 large egg
1/2 cup buttermilk
1 1/2 teaspoon vanilla extract

Preheat the oven to 350 F and lightly spray a donut pan with oil Stir together the flour, powder, soda and cinnamon and sugar. In a saucepan on medium heat, melt the butter. Stir occasionally. It will slowly begin to crackle and then eventually begin to turn brown. As this happens very quickly, soon after it begins remove from the heat. In a bowl beat together the egg, buttermilk and vanilla. When the butter has cooled, whisk in two tablespoons (including some brown bits) into the egg mixture. Gently add in the flour mixture until just mixed. Scoop (or pipe, whichever is easiest) the batter into the pan and back for 8-12 minutes, until a toothpick comes out of the centre donut clean. Allow to cool.

To glaze mix together small amounts of powdered sugar, milk, vanilla extract and a dash of salt until your desired consistency - more milk for thin, more sugar for thick. Now you can add food colouring, a couple tablespoons of cocoa powder or leave it as is. Dunk the donuts into the glaze and sprinkle rainbow sprinkles over top!

Grab a drink for dunking, Instagram these beautiful creations, and enjoy!

Monday, September 9, 2013

Coconut Oat Chocolate Chip Cookies


After finishing up the first week of school on Thursday, I was up and ready to let out some creative energy and stress with a mini bake-a-thon on Friday morning (very mini in that I only made two items, the second of which will be on the blog soon enough). Earlier in the week I saw a post over on Ambitious Kitchen for these amazing cookies that contained one of my favourite ingredients - did you guess it? - coconut. I love how the texture and taste of a simple chocolate chip cookie can change by swapping in and out a few different ingredients. These cookies are made dense with oats and shredded coconut, slightly sweet with brown sugar and ever so chocolatey with chocolate chips. The best part? No butter. Coconut oil comes to the rescue as a healthier fat and I'm now finding myself needing multiple jars for the many things I use it for - face wash, hair mask, baking, I can't believe I haven't mentioned my love for this oil yet. Anyways, I'm just blabbering on now so here's the recipe:

Ingredients 

1 1/4 cup quick oats
1 1/4 cup all purpose white flour
1 teaspoon baking soda
1/4 teaspoon sea salt
1/2 teaspoon cinnamon
3/4 cup melted coconut oil
3/4 cup light brown sugar
1 egg
2 teaspoons vanilla extract
1 cup unsweetened shredded coconut
3/4 cup semi sweet chocolate chips
2 teaspoons milk (preferably dairy)

Preheat the oven to 350 F. Whisk together the oats, flour, baking soda, sea salt and cinnamon. In a separate bowl, mix together the coconut oil and brown sugar on medium speed for about 1 minute. Add in the egg, milk and vanilla, mixing on medium speed until well blended. Gradually add in the flour mixture until combined. Mix in the shredded coconut and chocolate chips. Spoon the dough onto a cookie sheet lined with parchment paper and bake for 8-10 minutes, or until they just begin to brown along the edges. 

I'll be facing the battle of the books once again this week but will be much happier doing so with a cookie in hand! How could you seriously say no to a coconut chocolate chip cookie?


Monday, August 26, 2013

Quick and Easy Tea Biscuits


So remember when I went strawberry picking while visiting my Poppy a couple months ago? What a great day. One thing you can always count on at Poppy's house is an abundance of baked goods made by his wonderful wife, Diane. Diane never fails to have food ready for unexpected guests - whether its salads, cakes, pies, cookies, or my favourite - her scones. Diane has been baking long enough that she could probably make most of the family favourite recipes with her eyes closed, and the scones were no exception. When I asked about them she listed off the ingredients without question, and I quickly made note of them on my phone. These scones are made without butter giving them a much lighter texture, and are great either plain or with any mix-in your heart desires. I finally got around to making them the other day and thankfully it's not a family secret so I can share the recipe with you!


Ingredients
2 cups all purpose flour
3 tablespoons baking powder
1/2 teaspoon baking soda
1/4 teaspoon salt
1 cup 1% buttermilk
3 tablespoons vegetable oil
3/4 cup (approximately) of your mix-in
(I chose dried cranberries)

Preheat the oven 350 F and cover a baking sheet with parchment paper. In a large bowl whisk together the flour, baking powder, soda and salt. Stir in the mix-in of your choice. Add in the buttermilk and vegetable oil and gently fold until just combined, don't over work it. Spoon drops of the batter onto the baking sheet (about six biscuits) and bake for 10-15 minutes until crusty and brown on the bottom.

Even though these tasted great, I don't think they'll ever compare to Diane's, there's something about a visit to Poppy's house that makes everything taste better, even his toast is better than mine! Either way these are so easy to make, the perfect compliment to a cup of tea. They are best served warm out of the oven with a little butter or with some homemade strawberry jam.

Thursday, August 22, 2013

Week 7: What's in our Basket?

If you don't know what's going on with this basket stuff catch up here:
Week 1 / Week 2 / Week 3 / Week 4 / Week 5 / Week 6

I love fun sized things. Whether it be chocolate bars, toys, shoes (how cute are baby shoes), anything, the term fun size is literally fun - those little itty bitty things are just oozing with fun. Do I sound crazy yet? Bear with me. The farm must have felt my happy vibes from last week's mini watermelon because this week we got two! Two precious, baby watermelons that I can't wait to cut open and eat with a spoon. They are so easy to eat, and so refreshing - perfect for a summer snack. In addition to the fun sized melons we received a few other things in our basket this week that I am so excited about. Corn on the cob anyone? Here is what's in our basket:
Vegetable Half-Share

1 pint of cherry tomatoes, 1 bunch of kale, 1 bunch of romaine, 6 husks of corn, 1 mini watermelon, 1 bunch of green beans, 2 green peppers, so many potatoes and so many apples.


Fruit Share

1 mini watermelon, 2 large bunches of grapes, so many apples.

Their Potential

Swap fish and chips old friend, coleslaw, with this tasty kale slaw.

A great alternative to the classic potato, these apple chips are simple and delicious.

Focaccia bread takes grapes to a whole new level with the addition of walnuts.

Salty and sweet make this refreshing watermelon salad a winner.

This crostini takes you away from the usual pasta pairing.

I've said it before but grilling makes everything better, and I'm sure this watermelon lemonade is no exception.

Spice up your corn by grilling it and following this simple recipe.

Donuts are the new cupcakes, and these apple cinnamon donuts are where it's at.

Monday, August 5, 2013

Strawberry Rhubarb Oat Squares


Another trip to the cottage calls for more dessert! Since I had the afternoon off before heading up, I dedicated my time to whipping up some well deserved treats. Knowing I had rhubarb and strawberries in the freezer, I was looking for recipes that weren't pie but would still incorporate both ingredients. Having pinned plenty of strawberry recipes in June (in preparation for the picking season), I found this recipe on a Pastry Affair. Though the recipe calls for strawberry jam, I didn't want to use up my precious supply on squares so I substituted it with my beloved frozen fruits. It turned out great! We ate them as squares with tea, and also warmed with a scoop of vanilla ice cream for dessert. It was the perfect pie replacement for summer - not to heavy, but still sweet-tooth-satisfying.

Ingredients

6 tablespoon salted butter
1/2 cup light brown sugar
1 egg
1/4 cup honey
1 1/2 cups old fashioned oats
1 cup all purpose flour
1/2 teaspoon baking soda
1/4 teaspoon cinnamon

3/4 cup chopped rhubarb
1 cup chopped strawberries
4 tablespoon sugar

Preheat the oven to 350 F. Spray an 8 inch square pan with cooking oil. In a small saucepan on medium heat, add the rhubarb, strawberries and sugar and reduce until a jam-like consistency, stirring occasionally. In a large bowl cream the butter and sugar together. Beat in the egg and honey. Mix in the oats, flour, baking soda and cinnamon until combined. Press approximately 3/4 of the batter into the bottom of the pan until it is covered. Pour the strawberry-rhubarb compote overtop and spread evenly. Crumble the remaining batter on top until it is well covered. Bake for 20-25 minutes, until golden brown.

They are definitely best served warm, and if you're in cottage country hunt down some Kawartha Dairy Ice Cream and you'll be in heaven. I would also try this with blackberries, raspberries or apple - or all three for bumbleberry!

Monday, July 29, 2013

Chocolate Chip Cookies

                Chocolate chip cookies are one of those classic homemade goodies that I think just about everyone has a nostalgic love for. Though I don't remember when I first tried baking them myself, I do have many memories of flipping through my Mom's and Nana's recipe collection for cookie recipes, whipping up the recipe on the back of the chocolate chip bag with my mom, and slicing up those rolls of Pillsbury cookie dough at sleepovers (and eating a whole lot more dough than actual cookies). Though the dough rolls are pretty darn good sometimes it can be hard to find a recipe that never fails - a recipe that can be deemed "the best chocolate chip cookie recipe ever". In the mood to make cookies I was browsing through the Smitten Kitchen and found what she says is her favourite chocolate chip cookie recipe, so I obviously had to try it out for myself! With some minor adjustments I can definitely say that these cookies are a keeper. Crispy edges, soft inside and just the right amount of sweetness make these milk's perfect partner.

Ingredients 

1/2 cup white sugar
1/2 cup packed brown sugar
1 stick of cold, salted butter
1 egg
1 1/2 teaspoon vanilla extract
1/2 teaspoon baking soda
1 1/4 cup all purpose flour
3/4 cup semisweet chocolate chips
1/2 cup white chocolate chips

Preheat the oven to 300 F and line a baking sheet with parchment paper. Cream together the sugars and the butter. Beat in the egg, vanilla and baking soda until smooth. Whisk or sift the flour and then mix into the batter. Stir in the chocolate chips. Scoop small balls of dough onto the baking sheet (appx. 8-10 per run) and bake for 15 minutes or until lightly browned. Remove and allow to cool.

I made these bite-sized because I love just popping one in my mouth when my sweet tooth is around! I can't wait to make these again in the fall - sometimes theres nothing better on a cool day than a small snack of warm chocolate chip cookies, enjoy!

Monday, July 22, 2013

Strawberry Shortcake


Strawberry shortcake is my all time favourite dessert, no question. On most birthdays I've requested it over birthday cake, I've deemed it the perfect Canada Day dessert (red and white!) and if I'm ever asked for my opinion on what should be had, it's strawberry shortcake, always. So remember how I went strawberry picking a couple weeks ago? Well not only did we make some homemade jam, but we also had tonnes left over to freeze and use for future desserts - strawberry shortcake being one of them.


There are a few variations of this dessert, from layered cakes to mini angel food cakes but I decided on the classic layered biscuits - I'm also a big fan of individual portions. I first tried this recipe from Martha Stewart but it was a huge fail and I ended up with what seemed like gigantic pancakes. After scrounging through the internet some more I settled on adapting this recipe from one of my new favourite food blogs, Pastry Affair. They are dense and wholesome and were the perfect base for strawberries and cream.

Ingredients 

2 cups slice strawberries
1 tbsp sugar
1 cup whole wheat flour
1 cup white flour
1/4 cup white sugar
2 teaspoons baking powder
1/2 teaspoon cinnamon
1/3 cup cold salted butter
1 large egg
1 teaspoon vanilla extract
1/2 cup 2% milk (or half and half cream)
1 cup whipping cream

To start, line a baking sheet with parchment paper and preheat the oven to 400 F. Sprinkle the sliced strawberries with 1 tbsp of sugar, and set in the fridge until needed. Whisk together the flours, sugar, baking powder and cinnamon in a large bowl. Cut the butter into small cubes and cut into the flour mixture until it is crumbly. In a separate bowl whisk together the egg, vanilla and milk. Pour the milk mixture into the flour mixture and combine until just mixed and a dough begins to form. Knead the dough together a couple times to bind it and then roll it out onto a floured surface. Cut 3-inch rounds using a biscuit cutter or glass and transfer to the baking sheet. Bake for 15-20 minutes until the bottoms are golden brown. While the cakes are baking, whip the cream using an electric mixer on high speed until firm peaks form. Wait for the cakes to cool slightly, cut the in half and layer with strawberries and whipped cream. There isn't much else left to say other than enjoy! I could eat these biscuits plain with butter or jam even, but of course everything is better with strawberries (and much better) with whipped cream. You could also try adding in some chopped rhubarb or diced strawberries to the biscuits for even more flavour. Excuse me while I go feast...

Wednesday, July 3, 2013

Homemade Strawberry Jam

Homemade jams are one of my biggest weaknesses. I don't need crackers, toast or ice cream to enjoy them - just hand me a spoon and the jar and I'm going to town! After picking strawberries this past weekend, we couldn't let them sit for too long before they would start going bad. Since Monday was a holiday we took the time to make some strawberry jam. Though many jam recipes online don't use added pectin, I find that without it the jam has a runnier consistency than I prefer. Pectin is a thickening agent that comes naturally from fruits, and you can buy it in packets dried. We used Certo Light because we were comfortable with the brand, but also wanted to use less sugar. To make 4-6 small jars of jam from your freshly picked strawberries here's what you do:


1. In a large bowl, crush the strawberries with a masher, in layers, until you have 4 cups.
2. Stir in 1/2 cup sugar and an entire packet of pectin and let rest for 30 minutes.  After resting, add 3 additional cups of sugar and stir continuously for 2-3 minutes.
3. Fill the empty jars with boiling water.
4. One by one, empty a jar of the water and fill with jam until there is 1/4 inch of space from the top.
5.  Seal the jars with the lids.
6. Rest for at least 24 hours before keeping in the freezer. The jam will keep for up to one year. 

Enjoy it whatever way you like to use jam, but I'll be grabbing my spoon and trying to make this last longer than a few months! You can also try adding a little bit of vanilla extract or ground cinnamon, to give it some extra flavour.

Note: if you use regular pectin and not a light version you'll need to double the sugar